Leg Vise
- Step 1: Materials You'll Need ...
- Step 2: Make the Slot for the Supporting Leg ...
- Step 3: Drill the Hols in the Supporting Leg ...
- Step 4: Attach the Supporting Leg ...
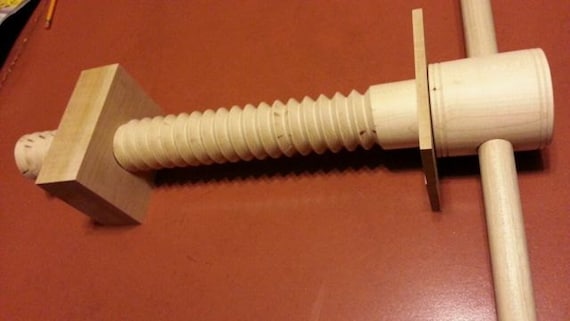
- Step 5: Place the Leading Screw ...

How can I Make my vise leg smaller?
Cut off some of the vise leg to make it more narrow towards the bottom end. Drill about 10-12 holes in the supporting leg. About 16 mm diameter. Depending on the size of the available wooden pin you got. I actually curved my own from a square piece. Keep 2 cm distance between the centres of each holes. Spread them over 3 parallel lines.
How do I install the vise?
Make sure the Vise is perfectly vertical when you drill the hole. Attach the leading screw and the screw base in place. Make sure that the supporting leg is kept horizontal at all times, and that it can slide easily.
How do you attach a vise to a table leg?
Drill a hole that will go through the vise and the table leg, big enough to let the leading screw pass through. When you do so, keep the vise in place and the supporting leg in the slot of the table leg. Make sure the Vise is perfectly vertical when you drill the hole. Attach the leading screw and the screw base in place.
What size vise screw for a leg vise?
For this leg vise, I decided to go with a Yost 18" Vise Screw. It's plenty strong, relatively cheap, and turns easily. I mounted the vise-screw's collar to the rear of the leg using four 3" #14 screws. To center the collar opening with the hole in the leg, I mostly just eye-balled it from above while making a few marks at the extents.

How thick should a leg vise be?
You want something thick enough that it will not deflect, long enough that you can use a lot of leverage on it, and wide enough to clamp larger pieces. For hardwoods you want at least 1.5" thick and for soft woods I would not go less than 2.5". Make it as long as your bench top to a few inches off the ground.
Which material is used for making a leg vise?
It is sometimes made of cast steel or malleable cast iron, but most are made of cast iron.
How do you make a simple vise?
0:117:17How to make a Workbench Vise ( DIY MOXON VISE ) - YouTubeYouTubeStart of suggested clipEnd of suggested clipThe radius jig definitely made this a little easier and more accurate. But you can totally use a jigMoreThe radius jig definitely made this a little easier and more accurate. But you can totally use a jig saw to round this over. On one side of the jaw. I need to round out a dado slab.
How do you forge a leg vise?
2:187:53Blacksmithing for Beginners - How To Forge A Leaf Spring For A Post ViseYouTubeStart of suggested clipEnd of suggested clipThe first step in forging the spring is to create the ears that wrap around the front leg of theMoreThe first step in forging the spring is to create the ears that wrap around the front leg of the vise. Here. I'm creating an offset at the lower end of the spring.
How do you make a wooden leg vise?
4:4112:03Making and Installing a Leg Vise - YouTubeYouTubeStart of suggested clipEnd of suggested clipI cut a small piece of wood. And then used my scrap pieces of steel to weigh it. Down. After thatMoreI cut a small piece of wood. And then used my scrap pieces of steel to weigh it. Down. After that dried I flushed it out with my random orbit sander and turned my attention to the handle.
What is the best material for a vice?
Steel. Steel is an alloy of iron and carbon. It is a material widely used in construction due to its tensile strength and high corrosion resistance. The jaw surfaces, handle, and screw of a vice are usually all made of hardened steel.
What can I use instead of a vise?
Cut out this bird's mouth shape using whatever you have: a back saw, jig saw, coping saw, band saw. Set up the long piece of wood as a stop against the end your worksurface. If you're right handed, that's the left side; if you're a leftie, then the right side. Clamp or screw it in place.
How do you make a metal vise?
2:5210:06Make A Metal Drill Press Vise Without Welding - YouTubeYouTubeStart of suggested clipEnd of suggested clipThe process here is the same as in all connection points in its build drilling a pair of holes inMoreThe process here is the same as in all connection points in its build drilling a pair of holes in each part to secure it with m12 allen bolts. This angle iron is way too thin for my planet.
How do you make a vice out of clamps?
2:388:45Quick-Clamp Vice for the Workbench - YouTubeYouTubeStart of suggested clipEnd of suggested clipI tried to mount this upside down but it made the claim skew a lot when I apply to any pressure. SoMoreI tried to mount this upside down but it made the claim skew a lot when I apply to any pressure. So I'm going to mount them both like this on the inside. And I cut a hole in. The bottom of my cubby.
How does a blacksmith leg vise work?
0:3710:04Vises for the blacksmith shop - tool of the day - YouTubeYouTubeStart of suggested clipEnd of suggested clipLike it does in a modern machinists vise the jaws are actually loose. And it's just a spring thatMoreLike it does in a modern machinists vise the jaws are actually loose. And it's just a spring that the heat makes it feel tight. But the jaw can move and wiggle a little bit. Because all of the weight.
How do you do a post vise stand?
4:316:10Making A Post Vice Stand - YouTubeYouTubeStart of suggested clipEnd of suggested clipAnd use some m8 coat screws to hold it in place. With all four screws in place and get the post toMoreAnd use some m8 coat screws to hold it in place. With all four screws in place and get the post to the vise put into that bracket. Then that mounting plate gets slid into the vise itself.
What is a post leg vise?
A blacksmith's post vise or "leg vise" is designed to be hammered on, unlike most bench-mounted machinist vises. The long leg transmits the energy from hammer blows all the way from the massive fixed jaw to the floor. Hot iron is secured in the vise and then shaped as needed by hammer blows.
What is a leg vise used for?
3:114:58What Is That Board With All the Holes | Wooden Leg Vise Pinboard ...YouTubeStart of suggested clipEnd of suggested clipThe other great benefit to a leg vise is you can actually use the leg itself to support the work andMoreThe other great benefit to a leg vise is you can actually use the leg itself to support the work and here I've taken a pin out and I'm allowing the work to stick down past the screw.
How do you make a foot vice?
1:3914:57Making the Ultimate Foot Vise! - YouTubeYouTubeStart of suggested clipEnd of suggested clipSuper easy you upload a drawing it gives you an automatic quote. And then the turnaround. Time isMoreSuper easy you upload a drawing it gives you an automatic quote. And then the turnaround. Time is really fast now let's get this thing tacked. Together. The way i designed.
What is a post vise used for?
What is exactly the why/use/purpose of a post vise? Good question! A blacksmith's post vise or "leg vise" is designed to be hammered on, unlike most bench-mounted machinist vises. The long leg transmits the energy from hammer blows all the way from the massive fixed jaw to the floor.
What is the point of a leg vise?
It uses two arms that are pinned to the jaw and leg at the top and connected to each other with a pin at the mid-point of the arms. The bottom of each arm rides against metal plates inset into the jaw and leg. This mechanism allows the jaws to be held parallel regardless of how wide the vise is opened.
Step 1: Materials You'll Need
I did not have a thick enough board so I cut a board in half and glued the two pieces together after making the surface of both pieces flat and clean.
Step 2: Make the Slot for the Supporting Leg
Cut a slot at one end of the board to fit the supporting leg in to it.
Step 5: Place the Leading Screw
Drill a hole that will go through the vise and the table leg, big enough to let the leading screw pass through.
Step 2: Materials, Measure, Mark, & Cut
Materials: -- I already had the bar clamp, it's 36" which it too big really but it works, 18", or 24" would be more manageable. -- All the wood I used was 2"x6" / 2"x8" cull lumber from a local hardware store (about 60cents a piece) (in case you don't know, when big box lumber/hardware stores get twisty or split lumber left over (and they get a lot) they cut it in half and sell it cheap). -- I found the 3/4" galvanized iron pipe (for the pivot and slide pin) in the trash (painted brown for some reason) -- To hold it all together I used wood screws. I used the cut sheet (previous step) to cut everything out. In the photo below I'm testing the fit of the back leg and jaw.
Step 3: Slide Box
When the vise is in use there is not really any weight on the slide (it is distributed through the slide pin to the shelf) so this step could be ignored.
Step 4: Slide
I used a scrap, screwed in place, as a spacer for the back of the slide
Step 5: Back Legs
I knocked the back legs into place and screwed them in place at the bottom then screwed the back jaw into the bench top and the top of the back legs (make sure you countersink any screws in the jaw face so that they don't bite into your work piece).
Step 6: Front Leg
I then attached the angle iron to the front legs. I did this because the slots I'd cut were a little sloppy, and the front needed to be stiffer. I did this with a single screw in each side. At this point I put the pivot pin in and stared at it for a while, looking for problems. I found a couple but ignored them.
Step 7: Jaws
The front jaw was attached by a (countersunk) screw into each leg. You can see the major problem in the photo below: the jaws don't meet up. You would think that something must have gone wrong in the measuring or cutting process which is why I'm going to blame the drill. I think a drill press might have been more accurate and stopped this...
Step 8: Fix Front Jaw
I could sleep that night, not with jaws out of alignment, so the next morning I cut the fir from test #1 down to size and planed it to a better fit. The paler wood makes a nice contrast... let's say that I intended to do this.