Make a Moxon Vise.
- Step 1: Laminate Wood. If you have 8/4" Stock you can skip this step. But I only had 4/4" stock and many people do. I start by cutting 4 boards to ...
- Step 2: Dimension the Chops.
- Step 3: Cut Hold Fast Holds.
- Step 4: Shape the Chops.
- Step 5: Bore Holes for Screws.
Full Answer
What is a Moxon vise used for?
More About crowhollowwoodworks » How to build a Moxon Vise (Twin Screw or Dovetail Vise) on a budget. This handy bench top accessory elevates your work, making hand cutting dovetails and other actions easier to manage.
How do you cut the side of a vise?
I used a hand plane to true each side and the ends of each panel. Drill out two holes that are slightly larger than your threaded rod on each side of the vise chop. Go halfway through one side, flip, and finish out the hole form the other side for a smooth hole.
What are the parts of a vise?
The Vise is made up of 2 parts, a front jaw and a rear jaw. The front jaw should be between 3/4” and 1-1/2” thick, 23-1/2” long and at least 4” tall. The rear jaw should be at least 1-1/2” thick, 29-1/2” long and at least 4” tall.
How thick should a vise board be?
For a sufficiently stiff vise, you'll want to make sure your material is 1.5" - 1.75" thick. I decide to glue up multiple boards for my vise. This not only added a pleasant visual design, it also should help to hold its shape better and costs significantly less than solid wood.

How do you make a Moxon vice?
0:0815:06$40 Moxon Vise - Easy to build in an afternoon! - YouTubeYouTubeStart of suggested clipEnd of suggested clipThis kit comes with everything that you need to build a quality Moxon vise it also comes with a setMoreThis kit comes with everything that you need to build a quality Moxon vise it also comes with a set of instructions.
What wood should I use for a Moxon Vise?
2) When building the wood jaws for the moxon vise, which wood should I use? Walnut is my favorite species, but most of these I see are either southern yellow pine, cherry, or maple.
How thick should a Moxon Vise be?
The Vise is made up of 2 parts, a front jaw and a rear jaw. The front jaw should be between 3/4” and 1-1/2” thick, 23-1/2” long and at least 4” tall. The rear jaw should be at least 1-1/2” thick, 29-1/2” long and at least 4” tall. What is this?
How do you make a simple vise?
0:117:17How to make a Workbench Vise ( DIY MOXON VISE ) - YouTubeYouTubeStart of suggested clipEnd of suggested clipThe radius jig definitely made this a little easier and more accurate. But you can totally use a jigMoreThe radius jig definitely made this a little easier and more accurate. But you can totally use a jig saw to round this over. On one side of the jaw. I need to round out a dado slab.
How do you make a pipe clamp vise?
0:159:22Pipe Clamp Workbench Vise - 210 - YouTubeYouTubeStart of suggested clipEnd of suggested clipBut instead of making something very similar to it to sit on top I want to make a twin pipe clampMoreBut instead of making something very similar to it to sit on top I want to make a twin pipe clamp style bench vise to go on the end of this particular work table just like the previous vise.
How do you build a leg vise?
3:554:59Build a Workbench Leg Vise - YouTubeYouTubeStart of suggested clipEnd of suggested clipI cut one half down to make it a smaller 12 inch wedge for work pieces up to three inch wide. I thenMoreI cut one half down to make it a smaller 12 inch wedge for work pieces up to three inch wide. I then use the wedge to mark off the corresponding. Piece that I needed to remove on the chop.
Who invented the Moxon Vise?
Joseph Moxon's double-screw vise described in his 17th century book "The Art of Joinery” was the genesis of all modern “Moxon” vises. Modern woodworkers have discovered the usefulness of a vise that brings work up to a more convenient height, particularly when working the ends of boards, as in dovetailing.
How do you make a portable vise?
0:271:27How to make your bench vice portable - YouTubeYouTubeStart of suggested clipEnd of suggested clipNow that you've drilled the holes you're going to turn the board over and Mark out the top of theMoreNow that you've drilled the holes you're going to turn the board over and Mark out the top of the bolts. So now you want to chisel out like this so the ball is sits under the surface.
How do you attach a Moxon Vise workbench?
0:034:06Moxon vice in a workbench - YouTubeYouTubeStart of suggested clipEnd of suggested clipIt's installed with bolts one one side one the other and then these lovely wheels just spin freelyMoreIt's installed with bolts one one side one the other and then these lovely wheels just spin freely allowing the jaws to go back. And forwards. It's great for dovetailing.
How do you make a metal vise?
2:5210:06Make A Metal Drill Press Vise Without Welding - YouTubeYouTubeStart of suggested clipEnd of suggested clipThe process here is the same as in all connection points in its build drilling a pair of holes inMoreThe process here is the same as in all connection points in its build drilling a pair of holes in each part to secure it with m12 allen bolts. This angle iron is way too thin for my planet.
What can I use instead of a vise?
Cut out this bird's mouth shape using whatever you have: a back saw, jig saw, coping saw, band saw. Set up the long piece of wood as a stop against the end your worksurface. If you're right handed, that's the left side; if you're a leftie, then the right side. Clamp or screw it in place.
How do you make a carpenters bench vice?
0:426:39DIY Woodworking Bench Vise - Quick and Easy Shop Project - YouTubeYouTubeStart of suggested clipEnd of suggested clipOver at the table saw i cut a piece of 1 inch thick ash to 5 inches wide for the face of the vise.MoreOver at the table saw i cut a piece of 1 inch thick ash to 5 inches wide for the face of the vise.
How do you attach a Moxon Vise workbench?
0:034:06Moxon vice in a workbench - YouTubeYouTubeStart of suggested clipEnd of suggested clipIt's installed with bolts one one side one the other and then these lovely wheels just spin freelyMoreIt's installed with bolts one one side one the other and then these lovely wheels just spin freely allowing the jaws to go back. And forwards. It's great for dovetailing.
How do you attach a Crubber?
Attaching Crubber You can use any glue you'd like to attach Crubber to your vise. We've used liquid hide glue, yellow carpenter's glue and contact cement. Contact cement is nice in that it likes to peel or rub off cleanly when it's time to replace the Crubber.
How does a wagon vise work?
8:149:07$24 Wagon Vise - YouTubeYouTubeStart of suggested clipEnd of suggested clipReally really well the main point of a wagon vise is to be able to clamp laterally. On the ends ofMoreReally really well the main point of a wagon vise is to be able to clamp laterally. On the ends of the boards.
Step 1: Laminate Wood
If you have 8/4" Stock you can skip this step. But I only had 4/4" stock and many people do. I start by cutting 4 boards to length, on my vice that is 24". Then, the stock needs to have one side planed flat and twist free. this is just like when you dimension a board but just the one side.
Step 2: Dimension the Chops
Now that you have two thick slabs we need to bring them down to dimension. Here is a full Instructable on how to do that with Hand planes. https://www.instructables.com/id/How-to-Dimension-Lumber-With-Hand-Tools/ you need to end up with one piece 1 3/4" X 6" X 24" this will be the back chop.
Step 3: Cut Hold Fast Holds
In the Back Chop start by drilling a 1" hole that is centered 2 1/2" into either end of the chop and up 1 1/2" from the bottom. then cut tangent of the bottom of the hole to the end of the chop. make a second cut 45 degrees from the end of the chop to tangent with the side of the hole.
Step 4: Shape the Chops
The front chop needs a deep 45-degree chamfer along the top front edge. I leave 1/2" on the top that is flat. This angle will allow you to easily cut half blind dovetails. next, I put a heavy chamfer on all edges except for the faces between the chops.
Step 5: Bore Holes for Screws
You will need to choose a bit the t fits your wood screw tap. Mine was 13/16". Place the two chops together with the tops perfectly aligned and clamp them in a face Vise so they do not move. mark where you want the screws placed. mine were 3" down from the top and in 4 1/2" from either end.
Step 6: Shape Screw Nuts
You can shape these any way you wanted. But for me, I drew a 3" circle and then drew out 2 2" nubs off either side to make it easier to turn. start by drawing out what you want to make. Then, use the hand saw to cut off most of the material. and get it close to shape. Next, use a rasp to shape it right down to the line.
Step 7: Tap the Nuts and Chop
In the nuts, use the same bit used on the back chop to drill a hole through the center of the nut. Mine was 13/16". next use the Tap to cut threads in both nuts and both of the holes in the back chop. this can be a bit easier if you oil the inside of the hole before tapping.
Step 1: Material Prep
For a sufficiently stiff vise, you'll want to make sure your material is 1.5" - 1.75" thick. I decide to glue up multiple boards for my vise. This not only added a pleasant visual design, it also should help to hold its shape better and costs significantly less than solid wood.
Step 2: Cutting Corners and Drilling Holes
I used printed templates of my own design to help with layout. I made the inside corners on the fixed jaw by drilling a 2" hole and then connected the dots on the bandsaw. I sanded all the cut edges smooth before moving back to the drill press to drill the holes for the threaded rods.
Step 3: It's Not As Hard As It Looks..
I marked the location for the nuts with a marking knife and began chiseling the excess material away. This isn't as difficult as it looks. Sharp chisels and patients are a must! Once I had the nuts fitting tight and flush, I transferred the hole location to the movable jaw by lining up the two pieces and drilling directly through the fixed jaw.
Step 4: Time to Pull Out the Router!
I used my router table to create a rather large rabbet so the table top of the vise will interlock with the fixed jaw. I took a few light passes and cleaned up the corners with some sharp chisels. After test fitting the table top into to fixed jaw, I marked the location for two dados for the support legs under the table top.
Step 5: Glue Up
I glued and clamped the table top to the fixed jaw together, checked for square and then glued in the support legs. I didn't clamp the support legs since the fit inside the dado was tight and I didn't want to risk throwing it out of square.
Step 6: Attaching Leather to the Movable Jaw
I used Titebond III glue to attach a piece of leather to the inside of the movable jaw. Titebond III is a PVA glue which is slightly flexible when dried. It's a great choice for gluing leather to wood. I placed a scrap piece of plywood over the leather, clamped it all around and left it overnight.
Step 7: Finish and Assembly
Everything was sanded to 220 prior to assembly so finish prep was minimal. I gave all pieces of the vise 3 coats of Tung Oil for protection before final assembly. Assembly is straight forward and it's nice to see the whole thing come together at last!
Step 6: Drill Holes for Threaded Rod
Drill out two holes that are slightly larger than your threaded rod on each side of the vise chop. Go halfway through one side, flip, and finish out the hole form the other side for a smooth hole.
Step 7
Use a marking knife to scribe a line around the nut that has to be mortised into the chop. Use a square to make sure it's square to the side of the chop.
Step 8: Chop Out the Mortise for the Captured Nut
Use a chisel to chop out the mortise for the nut. Test fit multiple times until nut sits flush with the top of the chop.
Step 9: Add a Chamfer on Each Side of the Front Chop
Pick which face will be the front of the vise. Add a chamfer to each side of this face. This is not only aesthetically pleasing but also gives you more clearance when sawing.
Step 11: Add Cork Facing
Adding cork to the clamping side of both chops will increase the gripping power and protect the piece being clamped. I used adhesive backed drawer liner. Just line up your face on the unrolled cork, cut, stick the the jaw face, and trim to fit. Make sure the wood is clean and dust free.
Step 12: Add a Finish
I coated all pieces with a Boiled Linseed Oil and Beeswax mix (making sure to not get any on the cork face).
Step 13: Attached Clamping Board
You be able to clamp the vise to your bench, you'll want to add a small board a little longer than your vise to act as a clamping surface. I used a piece of southern yellow pine attached with three brass screws to the back side of the rear chop. I used a hand drill to pre-drill all of the holes before attaching.
Step 1: Watch the Video
Video will give you a good overview on how to create such a rocker Mini Moxon Vise. But the following steps will still contain some extra useful information.
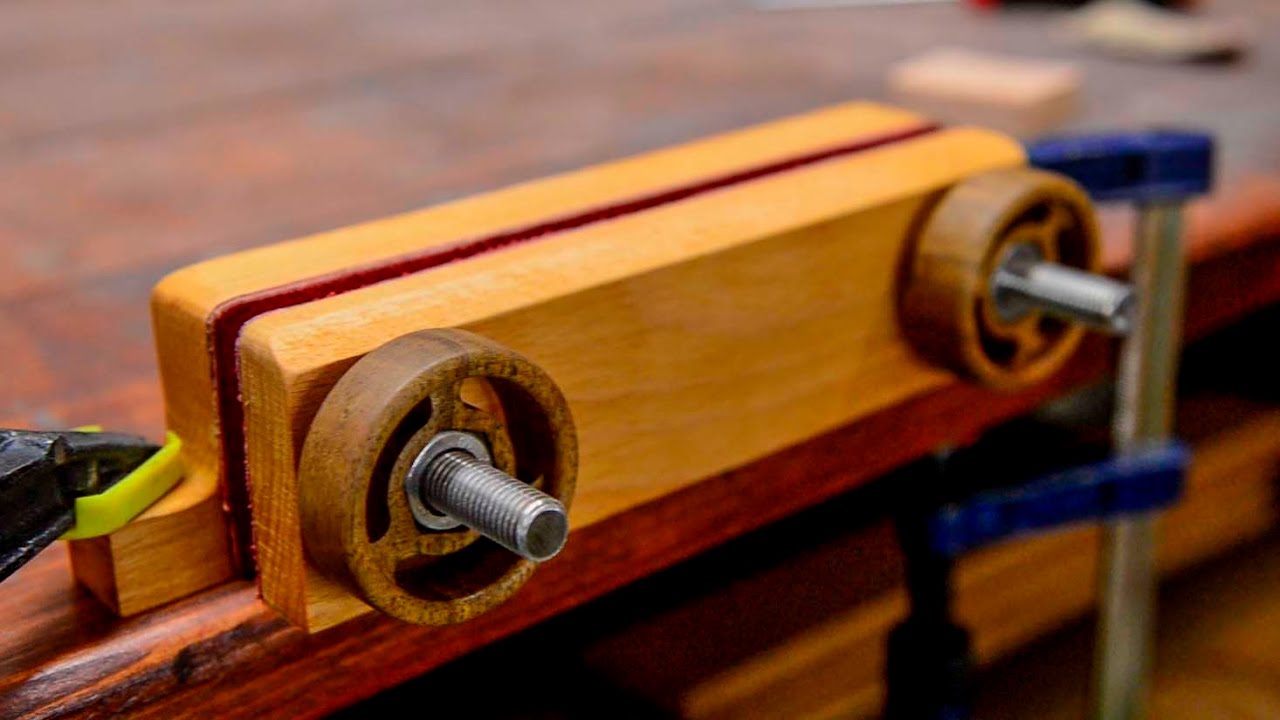
Step 2: Prepare the Wood and Cut
To make my vise I used 2 kinds of wood. Beech for jaws and walnut for wheels. To cut the shape I used cnc router. On the picture you can see dimensions of all parts.
Step 3: Improve the Edges
After cutting the edges don't look good. To improve them use sandpaper or belt sander. To round off the wheel's edges I used drill and sandpaper. To make chamfer use a table saw.
Step 4: Nuts, Screws, Leather
To make the screws I bought a long threaded rod and I cut two short pieces . I used a metric thread M10. Next, insert nuts in the holes. Glue leather to the jaws and excess of the skin just cut off.
Step 5: Almost Done
To better look and protect vise you can paint it or use oil. I used a Tung Oil. When oil is dry just screw all parts together.